How to Draw a Fish With Scales Updated
How to Draw a Fish With Scales
Beloved pets with cute glittering scales, goldfish are some of the most popular fish worldwide. Have you ever wanted to create a goldfish sketch simply do not know where to starting time? If that is the instance, nosotros have the perfect tutorial for you lot. In this guided stride-by-step tutorial, we give you all the acme tips and tricks for creating a realistic goldfish cartoon.
Table of Contents
- 1 Goldfish Drawing Tutorial
- 1.1 Stride i: Constructing the Goldfish'due south Main Body
- ane.2 Footstep 2: Cartoon the Goldfish's Top Fin
- 1.iii Step 3: Drawing the Goldfish's Main Bottom Fin
- 1.4 Pace 4: Cartoon the Goldfish'southward Secondary Lesser Fin
- ane.five Pace five: Drawing the Goldfish's Side Fins
- 1.six Step six: Cartoon the Goldfish's Final Lower Fin
- 1.7 Step 7: Drawing the Goldfish's Tail
- one.8 Step 8: Creating the Final Outline of Your Goldfish Sketch
- ane.9 Footstep 9: Drawing the Goldfish's Eye
- 1.10 Pace 10: Drawing the Details of the Goldfish's Gills
- 1.11 Pace xi: Calculation the Get-go Glaze of Goldfish Coloring
- 1.12 Pace 12: Adding the Shadow Color to Your Goldfish
- 1.13 Step thirteen: Drawing the Scales on Your Goldfish
- 1.fourteen Step xiv: Calculation the Outset Highlights to Your Goldfish Drawing
- 1.15 Step fifteen: Adding Secondary Highlights to Your Goldfish
- 1.16 Step 16: Adding Some Final Details to Your Goldfish
- 1.17 Footstep 17: Finalizing the Goldfish'due south Shading
- one.18 Step 18: Removing the Outline and Admiring Your Goldfish Sketch
- two Ofttimes Asked Questions
Goldfish Drawing Tutorial
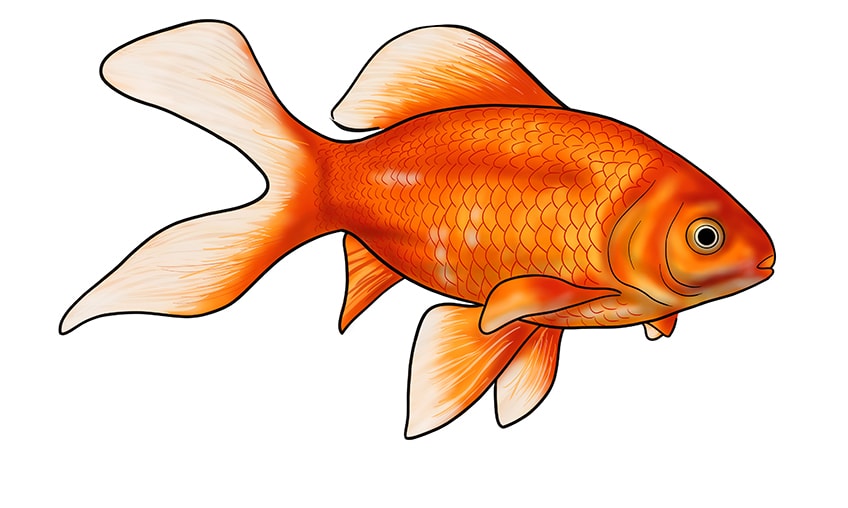
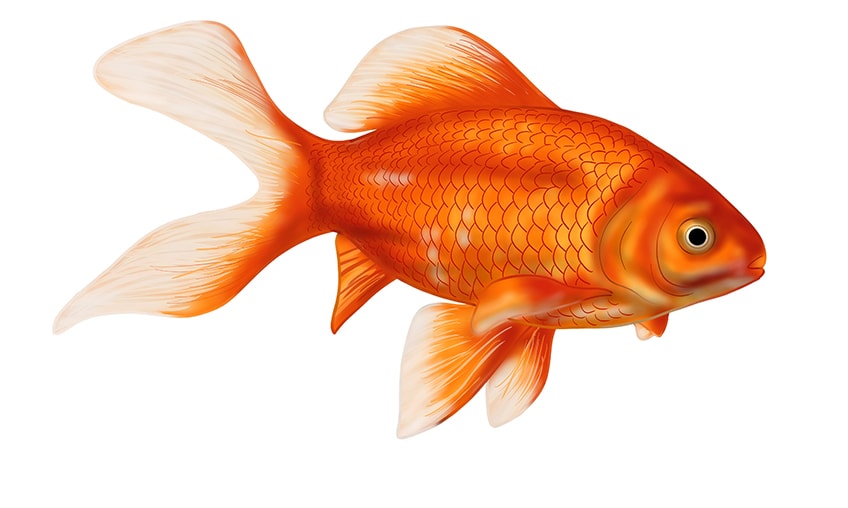
Although goldfish may seem intimidating to draw, our goldfish drawing tutorial breaks the process down into steps that are easy to follow. In this tutorial, you will not simply learn how to describe a goldfish, but you will also have the gamble to practice some highly detailed drawing and coloring techniques. You volition likewise be able to practice the skill of using structure lines. Construction lines and shapes are an essential part of our cartoon process. You will see how nosotros break down the overall shape into separate parts, and this will help y'all do the same on your own in the futurity. There are 18 different steps in this tutorial, and at the end, y'all will accept a drawing like this.
You can follow this tutorial using any medium yous choose. The tutorial was designed on a graphic tablet, merely yous can use pencil, watercolor, or acrylic pigment without having to adapt the instructions.
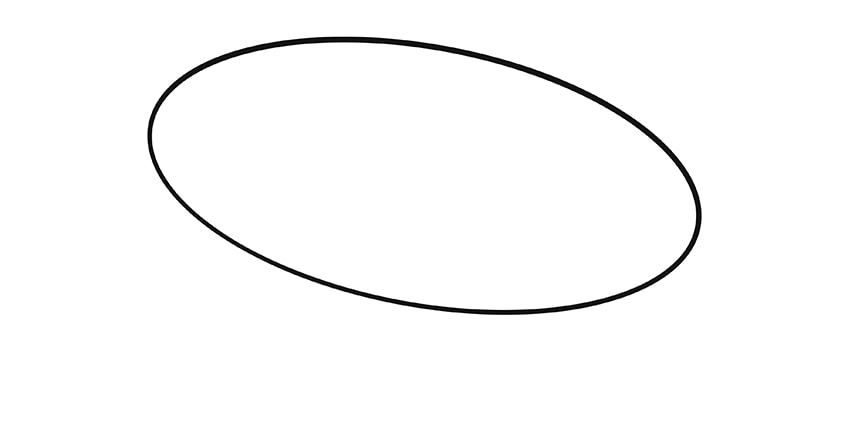
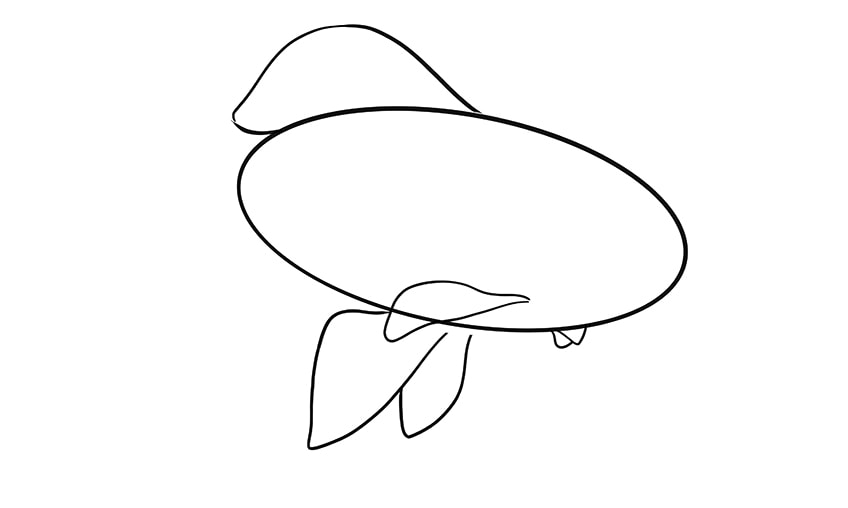
Step 1: Constructing the Goldfish's Primary Body
The showtime step in drawing whatsoever animal or object is to find a construction shape that will work as the ground for the principal shape. For a goldfish, this pace is pretty elementary. Goldfish are, at their foundations, oval in shape. Equally such, nosotros are going to apply an elongated oval shape every bit the construction shape for the main body of the goldfish. Yous desire this oval to be slightly angled downward towards the right side of the sheet.
For this step, however, you want to ensure that you lot describe your oval in the very heart of your canvass. Y'all need to make sure that you are leaving enough space on all sides of the oval for the other goldfish torso parts.
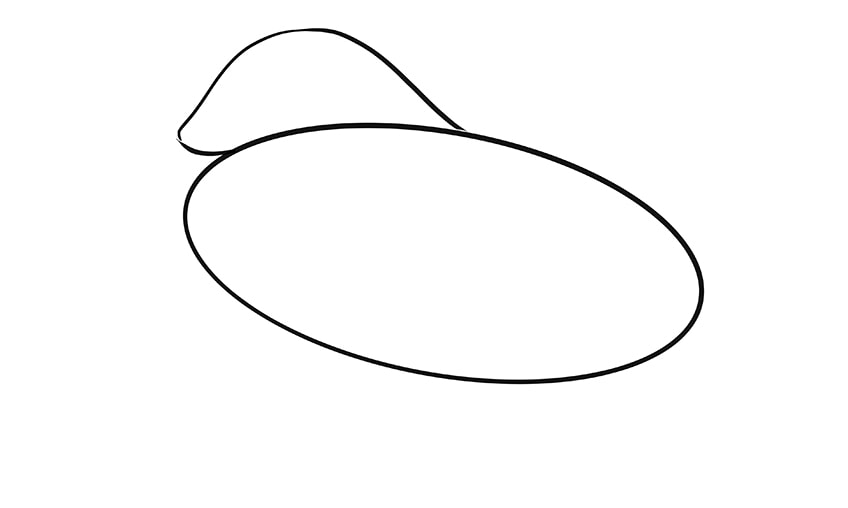
Step two: Drawing the Goldfish's Top Fin
In this second stride, we are going to depict a construction shape for the large fin on the top of the goldfish's dorsum. Brainstorm at the very center of the main body oval, and curve the line up, over, and down again to a betoken just higher up the dorsum of the oval. And then, gently bring this line back onto the superlative of the main body oval with a small curve.
The structure shape we are using is more than of a freehand shape, and so it may accept you lot a couple of tries to get it perfect.
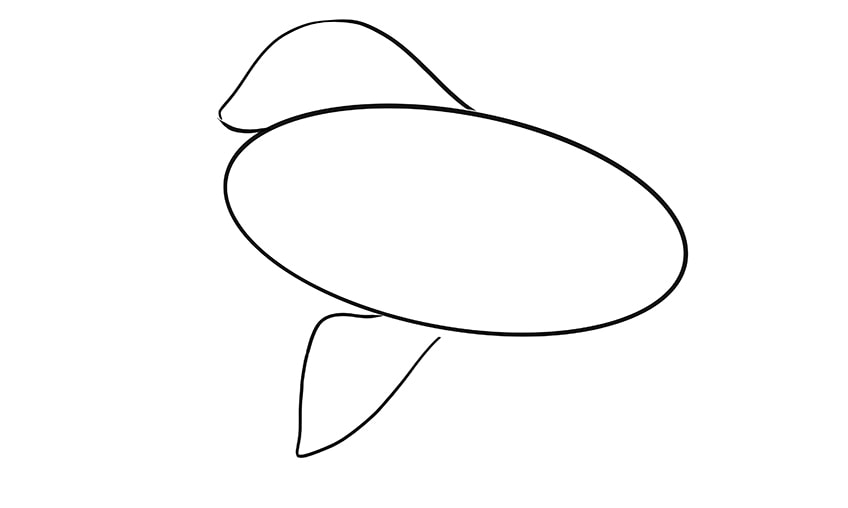
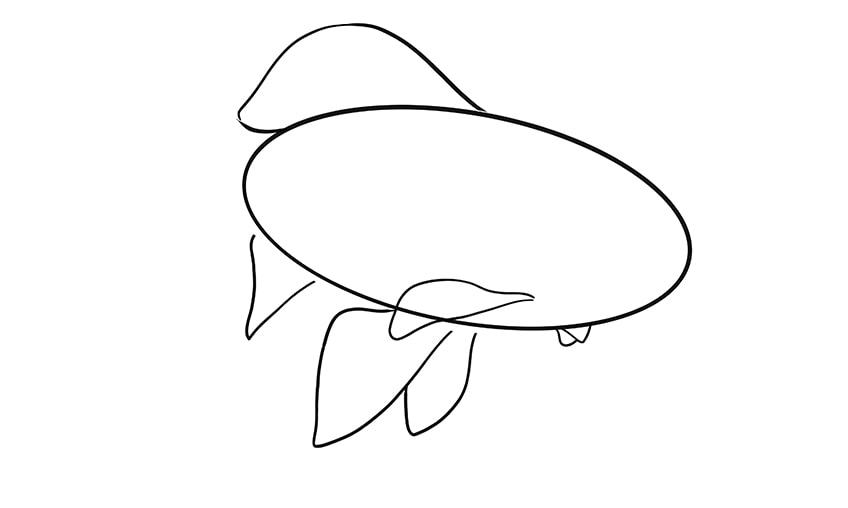
Step iii: Drawing the Goldfish's Main Bottom Fin
Yous will need to grit off your freehand skills again for this next pace. Yous can brainstorm again at the central point of the bottom of the main body oval. Accept this line down in a fairly straight line that curves slightly towards the back of the goldfish. Then, you can bring the line almost straight back up towards the master oval, but simply before you touch on the oval, curve the line towards the front and upwards.
Again, you may find that yous demand to erase and re-draw this line a few times before you are happy with the terminal shape. Take a look at our example below if y'all need to.
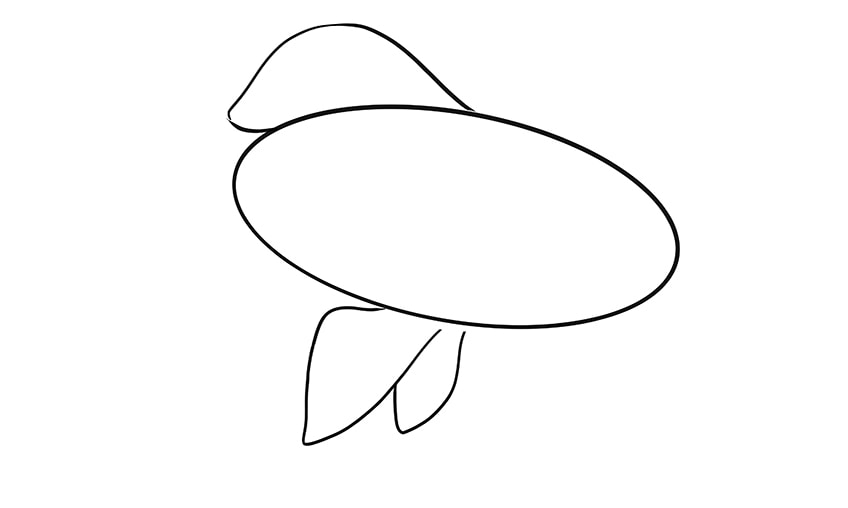
Stride four: Drawing the Goldfish's Secondary Bottom Fin
Goldfish actually have a grand total of six fins, including a large pair on their bellies. The large lesser fin nosotros drew in the last step is the closer ane of the pair, so it is larger than the i we are going to draw at present. Y'all are but going to repeat the process from the previous stride but on a smaller scale. In fact, this 2d bottom goldfish fin should exist about half the size of the first one. One important matter to notation is that you should begin this second, smaller fin slightly in front of the offset.
Hopefully, y'all will see that drawing this second fin was much easier than the offset. If you had to re-draw the outset a few times too, then this 2d fin should have been considerably easier, and that is from practice!
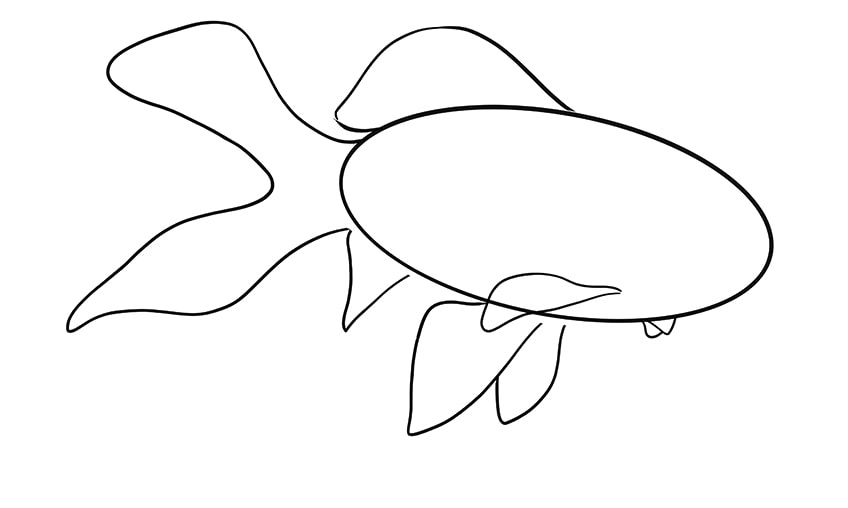
Footstep 5: Drawing the Goldfish'southward Side Fins
In addition to the main fin on the back and the two main fins on the bottom of the goldfish's body, nosotros also demand to add the ii smaller side fins. These side fins come out of the side of the goldfish's body, and this introduces our starting time need for perspective.
Considering we are looking at the goldfish from the one side, we will see the first of the 1 side fin as it comes out of the goldfish'southward flank, merely we volition only see the tip of the other side fin every bit it pokes out beneath the goldfish.
Begin by drawing the fin on the side closer to apply. Start this fin just in front end of the smaller bottom fin, and just inside the principal trunk oval. Curve the elevation line of the fin slightly upwards before taking information technology downward, overlapping slightly with the main lower fin. Then accept the line back upwards into the main body to join with the starting point. For the other side fins, just describe 2 little "V" shapes poking out from the lesser of the chief torso oval, just in forepart of the start of the other side fins.
Step half-dozen: Drawing the Goldfish's Concluding Lower Fin
At this betoken of the tutorial, information technology may seem like the bottom half of the goldfish is a trivial crowded with v out of the vi total fins. The reason for this is that the goldfish actually uses the bottom fins to do the majority of its pond and maneuvering in the h2o, while the pinnacle fin is by and large for balance.
This very back fin is going to be the sharpest and near triangular that we accept drawn then far. Just before the cease of the main torso oval, describe a sharp little fin, like the one you can see in our example beneath.
Step 7: Drawing the Goldfish's Tail
This stride is the terminal one earlier we create the concluding outline of our goldfish drawing. Beginning from only below the end of the peak fin at the back of the goldfish, draw a line that curves up, before going downward slightly, and and so doubling back towards the back of the body oval. Before yous become too close to the body oval, bend the line back out and downwards. After a slight bump, this line should come up to quite a sharp indicate, before curving back up to run across the end of the last fin we drew in the previous step.
Y'all are going to accept to draw this tail freehand because it gives a more natural impression. You do non desire this tail to be perfectly symmetrical, and information technology does not even have to look exactly like ours. Remember, in that location is no shame, only practice, in re-drawing.
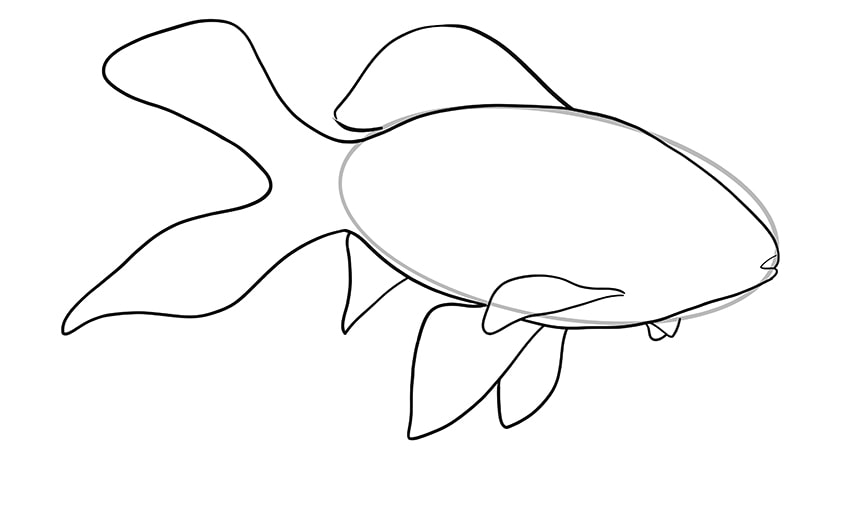
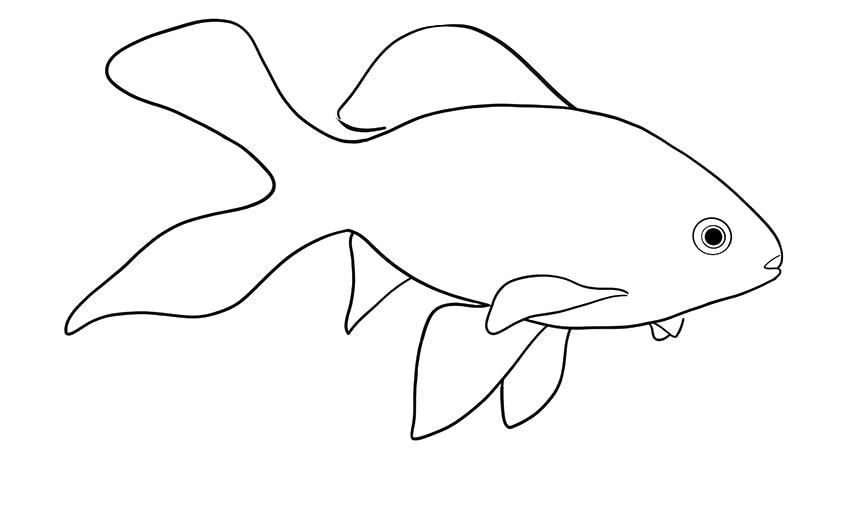
Stride 8: Creating the Final Outline of Your Goldfish Sketch
In this tutorial, we have only used one real construction shape, and that was the oval for the main body. The result of this is that you lot tin outline all your fins perfectly and concentrate on creating the body outline from the oval. For the almost part, you can follow the oval outline quite closely to outline the primary body of your goldfish sketch. You do, notwithstanding, want to make the front end terminate slightly more pointy and less perfectly oval. You lot tin add a few footling bumps in your outline and terminate past drawing a slight indent and bend at the very front of your goldfish drawing.
Draw a little bottom lip and a pocket-size curve on the inside of the nose to highlight your goldfish'southward oral fissure. When you are happy with your outline, you can erase any remaining and visible construction lines.
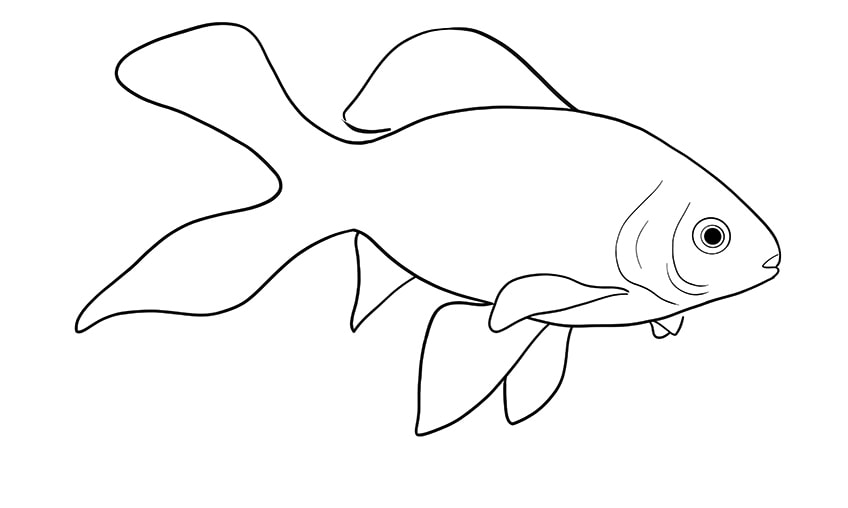
Stride 9: Drawing the Goldfish'southward Heart
This is a very uncomplicated step, but the flim-flam is to get the placement of your goldfish'south middle perfect. Begin by drawing a fairly big circumvolve that is quite close to the mouth, and in line with the terminate of the front bottom fins. Inside this circumvolve, yous tin describe another slightly smaller circle. Inside this second circumvolve, draw and colour in a final circle that is simply merely smaller than the 2d.
This inner black circumvolve represents the iris, which is an essential feature in whatever realistic slice of goldfish art.
Step ten: Drawing the Details of the Goldfish'southward Gills
Step x is another fairly straightforward footstep in the goldfish drawing process. Using two long lines that bend in the opposite direction to the front of the goldfish's olfactory organ, draw the goldfish's gills. You lot can then apply two slightly shorter lines that hug these long lines to add more item and definition.
At this stage of the goldfish sketch tutorial, you should start to see the beginnings of a realistic goldfish appearing on your canvas. In the adjacent few steps, we are going to start adding the characteristic goldfish colors.
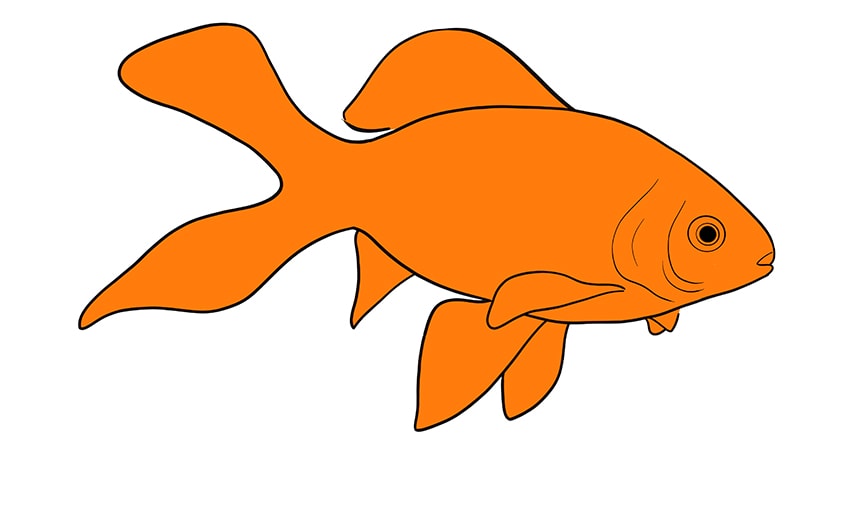
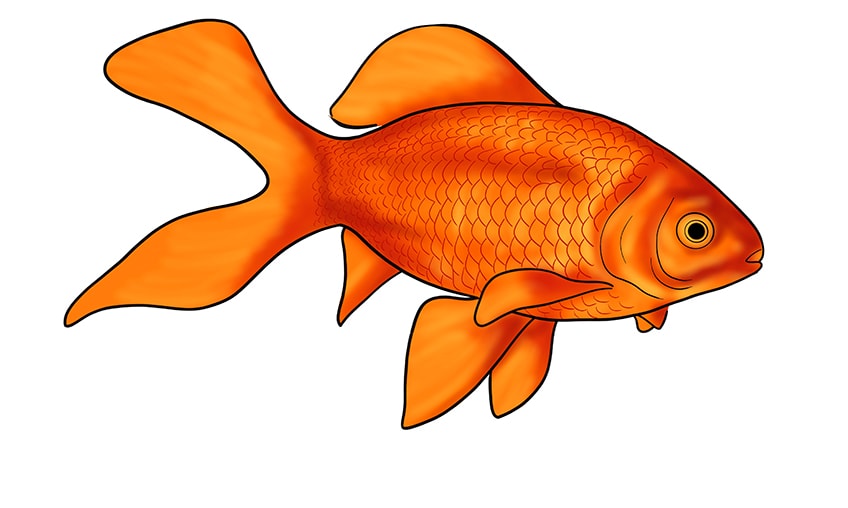
Footstep 11: Adding the Starting time Coat of Goldfish Coloring
At present the excitement begins! Choose a mid-tone orange shade to utilize as the base of operations color for your goldfish sketch. You want to ensure that your base orange shade is non also dark or besides lite, as nosotros will be adding darker shadows and lighter highlights in the adjacent few steps.
Whether you are using colored pencils, watercolor, acrylic, or digital mediums, fill the unabridged shape of your goldfish with your mid-tone orange shade.
Pace 12: Adding the Shadow Colour to Your Goldfish
The main goal of this step is to ascertain the three-dimensional nature of your goldfish cartoon by using a shadow color to highlight the points of the trunk that dip away from the states. Cull your slightly darker orangish shade, and carefully utilize it to add some shading to the dissimilar parts of your goldfish that are not catching the calorie-free.
To create a sense of realism, the best places to add this shading are the base of operations and edges of the tail, the lesser ends of all the fins, around the gills, around the nose and eyes, on the bottom of the top fin, and all around the edges of your goldfish's torso.
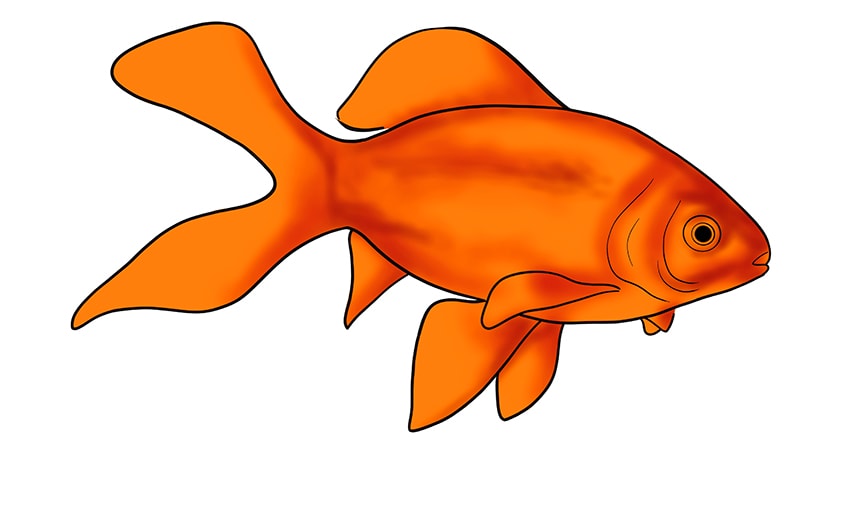
Step thirteen: Drawing the Scales on Your Goldfish
In this stride, we are taking our goldfish drawings to the next level of realism by calculation the scales. Using a very fine brush or pen of the same darker orange from the previous step, begin to draw lines of scales starting at the largest gill and moving backward.
Ideally, to enhance the sense of realism in your goldfish art, you want these lines of scales to curve around the goldfish's body. If you recollect about your goldfish in three-dimensional infinite, information technology is circular and the scales wrap all around it. Endeavour to follow the curve of the gills all the way down the body.
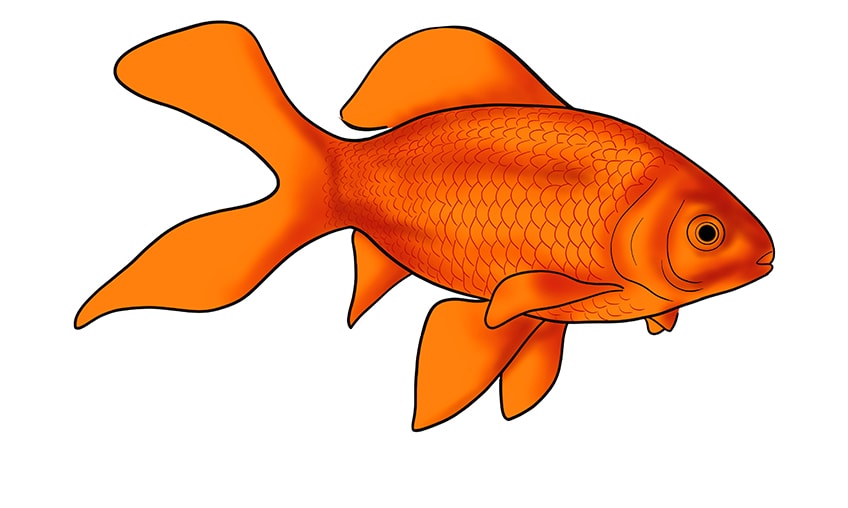
An boosted tip we have for you lot is to draw a single line of scales at a time, so move onto the next line. The lines of scales should also be drawn in what we call aRunning Bond.This technique involves making certain that each following layer does not meet the endpoints of the previous. In other words, you desire the dip points of each scale to sit at the center of the tiptop of the scales in the row before.
If you lot need a visual representation of running bond, take a look at the example below.

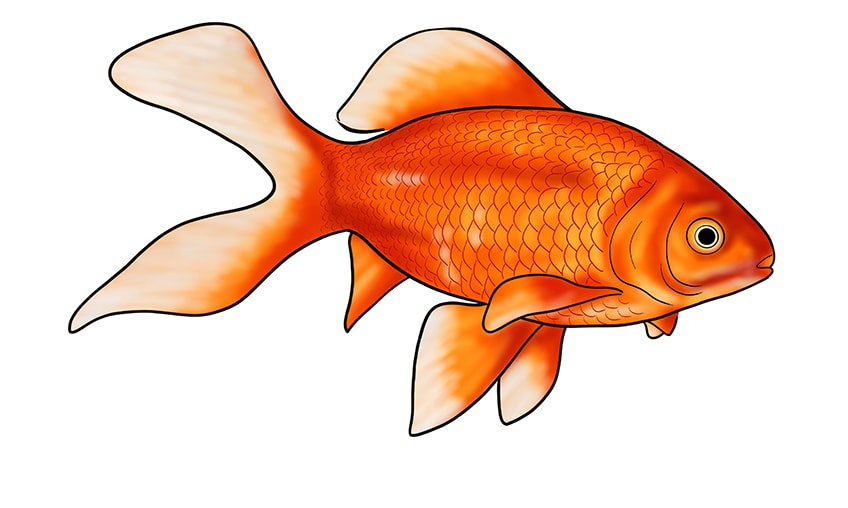
Step 14: Adding the First Highlights to Your Goldfish Drawing
In this stride, we are going to use your lighter orange highlight shade to add some definition to the areas that stand out and catch the lite. Using a brush, lightly shade the areas of the tail and fins that you did not shade earlier. You lot want the tail and fins to be much lighter than the residue of the trunk, just you want to maintain the blend from the touch on of shading on each fin. Add some highlight around the face and within the gills, and finally, add a small nuance of highlight within each scale.
Tip: the highlighting should subtract the further you go towards the rear scales.
Step fifteen: Calculation Secondary Highlights to Your Goldfish
In the last pace, we used a light orange shade to add highlights. In this step, we are going to utilise white to make some of the highlights pop even more. The apply of white not only makes your highlights more dramatic just besides helps create the sense of a color fade.
While you want to add some white highlight to areas around the face, you want to focus well-nigh of it on the edges of the tail and fins. In fact, you want to make these ends equally white equally possible, so they appear as if they were fading to transparency.
To add some extra realism to your goldfish sketch, y'all tin can try adding some white highlight to 1 or two scales towards the back of the goldfish.
Footstep 16: Adding Some Final Details to Your Goldfish
We are about at the end of the goldfish art tutorial, merely before we terminate off, nosotros are going to add together a few more details to brand the realism in this drawing sing. Use a very fine brush or white pen, and utilise information technology to draw some very thin and sharp strokes throughout the tail and fins. You lot want these pilus-like strokes to flow towards the back of the drawing.
When you have drawn the white hair lines, you can then do the same with a darker orange shade, just bringing the shading from the darker parts of the fins and tail into the white parts.
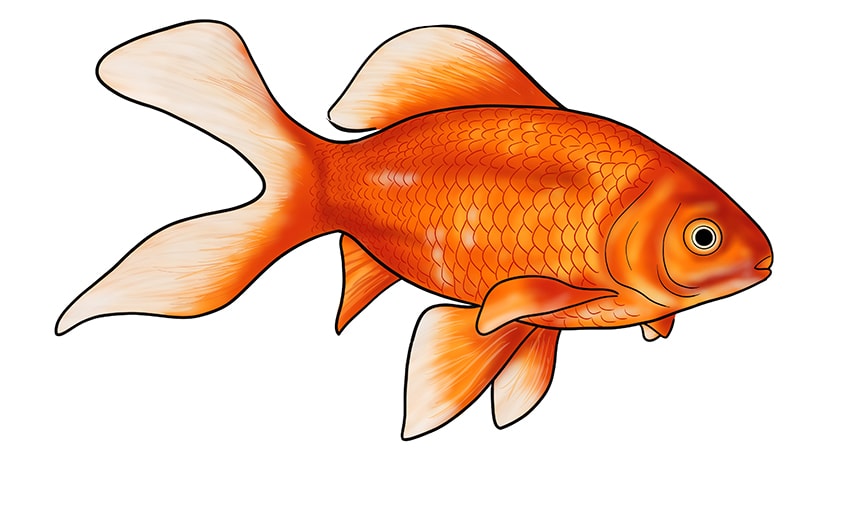
Step 17: Finalizing the Goldfish's Shading
To add the final realistic touch to your goldfish drawing, apply the smallest amount of blackness paint to shade the bottom of the goldfish always-so-slightly. You simply want to give the impression of shadow and dimensionality, be conscientious not to overwhelm your drawing. You lot can also add together a affect of shading effectually the eyes and gills to contour the face a little more than.
Stride eighteen: Removing the Outline and Admiring Your Goldfish Sketch
The last pace of this how to draw a goldfish tutorial involves removing the outline. If you practise not want to remove the outline, you are more than welcome to keep it. If, notwithstanding, yous are looking for the greatest sense of realism, removing the outline is your best bet.
To retain the sharpness of your outline one time you lot have removed the blackness, you can use a touch of very lite orange on a fine brush to outline your goldfish.
Well washed, you lot have made it to the terminate of this in-depth how to depict a goldfish tutorial! We promise that y'all accept enjoyed the process and that y'all are happy with your final goldfish fine art slice.
Oftentimes Asked Questions
Is It Difficult to Create Goldfish Art Works?
Goldfish practice have many little details that yous need to go right, just it is not difficult to blast these if y'all follow our in-depth step-by-step goldfish drawing tutorial.
Can I Use the Same Cartoon Process to Draw Other Fish?
You lot definitely can use the basic principles of this tutorial to describe other types of fish. You will need to find reference photographs for the other fish to discover how many fins they accept, where they are, and how they are colored.
How to Draw a Fish With Scales
Posted by: wardexplesse.blogspot.com
0 Response to "How to Draw a Fish With Scales Updated"
Post a Comment